Labtech, as we know is super powerful. Power, however, like any good super hero will tell you, is useless if you don’t know how to control it. In this post I’ll look at creating a way to prevent unauthorised access to remote machines which also serves as a good introduction to some of the more complex features within Labtech.
One of our clients at Oakson (we provide IT Support in Brighton, don’tcha know) wanted to ensure that no one could access any of their users PCs without the user approving it. They wanted this for all machines at several locations as well as the odd workstation at other locations. Welcome to the wonderful world of Custom Fields, Extra Data Fields, Searches and Groups (I think that’s everything).
A few basics
So first up, let’s cover a few basics. The ability to require the end user to approve a connection is found in the Templates section of Labtech. We’ll need to assign that to a group of computers, and assigning things to groups of devices is done by using the Groups function. We’ll need a way to dictate which machine receives our custom template, so we need to look at additional fields (for some reason also called Extra Data Fields in some parts of the UI). EDFs will allow us to have a tick box for each workstation to turn this feature on. Finally, we’ll need to find all the machines that have this ticket box set, and this is the job of a Search.
Templates, EDFs, Searches and Groups. Phew. Here’s an amazing diagram showing how it flows together.

I think you’ll agree my art classes are paying off.
Extra Data Fields
Let’s start down the road of chaos and create our additional fields, or Extra Data Fields.
- Click on the Dashboard icon and go to Config > Configurations > Additional Fields. On the Computers tab complete your details as below. I’ve specified a tab called Oakson. This will create a new tab in the device window with our custom, sorry, additional, sorry, extra data fields on it.
Make sure you set this to be a check box, we want this to be an absolute. Click Save when you are done.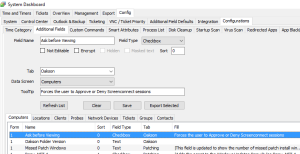
Computer level EDF fields
Then do the same on the Location tab. Note that the field name needs to be different as the Name shown (ie the ‘label’) is also used as the field name. Horrid, but we have no choice. Having a Location level EDF will allow us to turn this feature on for either individual computers *or* entire locations. Again, hit Save when you are done.
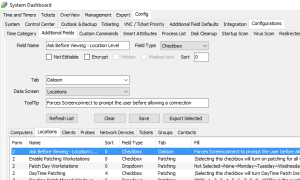
Location level EDF fields
- Now we can test that the EDFs are showing. Open up a device and go to Data Tiles > then Extra Data Fields. You should see your named tab. In my example it’s called Oakson (have I mentioned we provide IT Support in Brighton, UK?).

EDFs on the device screen

Location level EDF fields
Open a location and click on Info and choose the name of the tab you created. There you’ll see your EDF.


So that’s the Extra Data Fields created. Dead simple so far. Next up, the Templates.
[nextpage title=”Templates”]
Templates
In Labtech, templates control a host of device, location or client specific settings. These are things like when the clients patches will be installed, reboot times, icon branding and the like. In our case templates also manage the settings for Screenconnect and remote access authorisation. Let’s dive in and take a look.
- Go to the template node on the left nav bar in Labtech. Click on the Admin node and then right click on Templates and create a new one.
- Give it a meaningful name and pop to the Access tab. Set the Remote Access Mode to Ask along with the Screenshot Mode. This will cause the end user to receive a pop-up from Screenconnect requesting their approval for the connection. If a user isn’t there then the connect won’t be successful, so make sure someone is around to approve it.
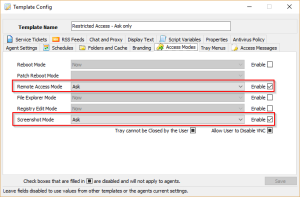
Select the access options you want in your new template
It’s worth noting that there is an “Ask then Deny” option along with an “Ask then Approve” option. These are only applicable when connecting via the legacy VNC option and don’t do anything in Screenconnect.
- Once done, hit Save. You are now ready to move on, player 1.

Up next we’ll look at creating the search before finally moving on to creating the group and pulling it all together.
[nextpage title=”Creating Searches. “]
Searches
So we now have our Extra Data Fields which allow us to mark which machines or locations we want to apply the template to. We now need to create a search which will return a list of all the machines that have the EDF field set OR which are in a Location which itself has that EDF set. For added measure, we want to exclude servers from the mix as those beasts rarely have a user sat in front of them.
- Click Search on the top, ever-so large, nav bar.
- Now we need to define our criteria. Here’s how I set mine up.

And…and…and….and….
- To recreate this, click on the red And in the top left corner and choose Add Group. A new And operator will appear under that. Click that new one and choose Or from the menu.
- Underneath the Or operator is a line of blue text in square brackets. Click this and choose Computer > Location > Extra Data Field > Tab Name > Your EDF name.
- Click the + next to the Or operator and again click the blue line of text. This time choose Computer > Extra Data Field > Tab Name > Your EDF Name.
- Finally click the + next to the And operator and again click the blue text and choose Computer > OS > IsServer and change the green text to False.
- With your search criteria created enter a name in the text box at the bottom of the search screen and click Save.

My fingers hurt from all this typing
- You can test this Search by clicking the Search button at the top of screen. If you have any devices or locations with the EDF already set they should show up.


Now, with the search done we can put it all in to a group and go and have a cake.
[nextpage title=”Grouping it all together”]
Groups
And finally we can put it all together. A group allows you to, well, group together computers based on a search criteria and apply a stack of things to them, in this case our template.
- Right click the Group node on the left side nav and choose Add Group. You’ll see a new group icon appear called New Group. Double click that.
- Give your group a clear name and set the options like they are in my screenshot below.
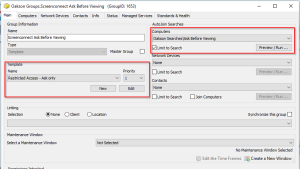
The red bits are important. Really really important.
- From the Template drop down choose the template you created earlier. Set the priority to 1.
- In the AutoJoin Searches section choose your saved search from the Computers drop down. Make sure you tick the Limit to Search checkbox. The Limit to Search option ensures that only computers matches the search results are added to the group and, more importantly, that they will be removed from the group when they no longer match. If you didn’t tick that box, devices would effectively never be removed from the group.
The group will assign computers based on the search at set intervals. If you want to speed that up and have any devices with your EDF set added to the group right now then click the Preview/Run button and then choose Auto Join Now. This will force the search results to be added to the group, but you can always wait a while. Be patient. A little bit zen.
- Hit Save to save the group definition.

Testing it.
You should now be able to see your EDF field in both the Location properties screen and the Device properties. If you tick the EDF in the a location all the workstations in that Location will be added to your group. Alternatively you can tick the EDF on a device only and just that one machine will be added.
If you want to do a test go ahead now. If you don’t want to wait for the scheduled autojoin to kick in then you might need to open your group, click Preview/Run, and then click the AutoJoin Now button to force machines to be added to your group.
I’d love to know how you get on so use the comments to keep in touch.